
Learning upholstery - time to try something new
This post has been well over a year in the making. But I really wanted to be able to write about my experience of learning how to do upholstery once I’d actually, you know, learnt it. And had something to show you for all my learnings and efforts.
And now I do.
As I wrote about in THIS BLOG, there have been moments during the five years since I left full time work that, in spite of being busy and generally fulfilled, I’ve felt the need to do or learn something new. Scratching that itch has involved me doing some hugely satisfying volunteering - for a cancer care charity and at my local vaccination centre and finally getting around to learning to play bridge (and as I’ve yet to meet a bridge player who doesn’t say they’re still learning, however long they’ve been playing, that’s something I fully realise will be a lifelong project).
Deciding to try to learn a bit about upholstery was born out of a desire to flex my creative muscles. From being a child watching and helping my brilliantly talented, amateur carpenter father in his workshop, via being the first pupil in my school ever to do a stage design A-Level, to a widely and wildly practical stage management diploma at drama school, and DIY of every kind since, I’ve always loved making and doing things with my hands.
I’ve no idea why upholstery particularly caught my attention - other than it fed into my ever-growing desire to be less wasteful and re-purpose and re-use as much as possible - but after some extensive rummaging, I found an evening course not too far away from my home which I could drive to (essential when you have to cart the item you’re upholstering there and back each week).
Then it was a question of deciding on my first project. Since I didn’t have anything in my own little house that I felt needed immediate attention, I headed to my local Sue Ryder shop where I found an Ikea dining chair for £5. It was perfect. Clearly in need of some tlc, but not too complicated.

The charity shop Ikea dining chair
Presenting myself in the well-equipped workshop at the St Albans Upholstery School (see end for full details) on the first day of the course was surprisingly nerve-wracking, but the lovely instructor, pink-haired Taryn, quickly put me at my ease and the other members of the group were equally welcoming and helpful.
You will, I’m sure, be grateful to know that I’m not going to take you through all the details of the processes, techniques, and tools that I learnt to use, other than to say there were a lot of them - far more than I imagined - and that whilst I mastered some without too much trouble, I found others frustratingly fiddly and difficult.
But under Taryn’s watchful and masterful eye, and with the encouragement and support of the others in the group, my first chair slowly morphed from its stripped-down skeleton into a re-webbed, re-foamed, re-lined and eventually re-covered version of its former self.
Here’s how various stages of that process looked:

First stages of stripping. Getting back to the bones of the chair

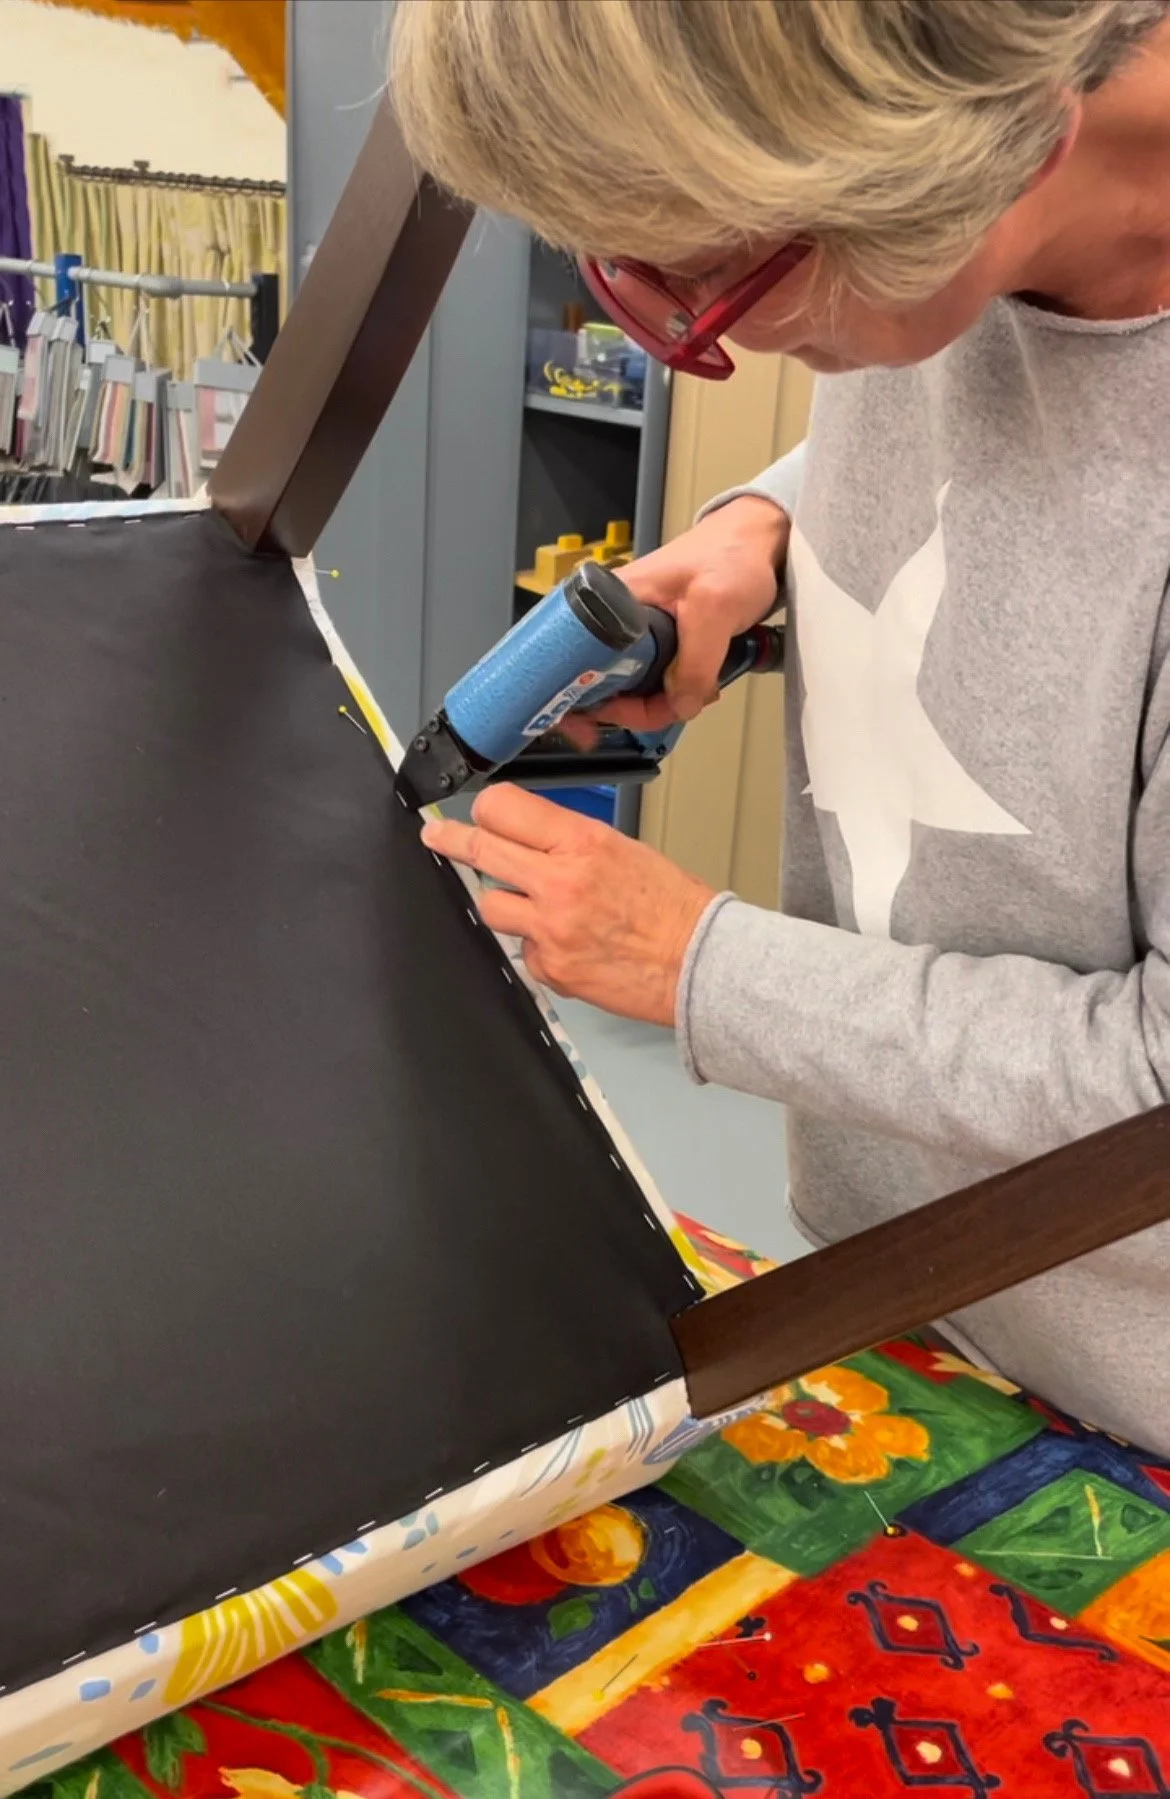
New foam measured and then cut with a very old fashioned electric carving knife! And then fitted to the seat and back before being covered with lining fabric. Stretching and anchoring the lining fabric is one of the fiddliest and most vital stages of the process. If it’s not done properly, the finished result will look shoddy.

Here it is, fully lined

Finally time to put on the first part of the fabric. It took me weeks to get to this stage. Can you tell how excited I am!

Second stage of the fabric covering on the front of the chair back and the hessian covering over the back of the back. That was then covered with the fabric.

The final stage was stapling the under-seat cover in place

Ta dah! The finished chair, front and back.

Teacher Taryn is as delighted as I am. Phew!
Despite the project taking way longer than I thought - partly because there was so much more to it than I’d realised and partly because the classes were only two hours long - I was so thrilled with, and I admit absurdly proud of, the finished result (which I’m delighted to say is now being happily used by my nephew) I felt emboldened enough to embark on a second challenge.
This time it was something for my little house.
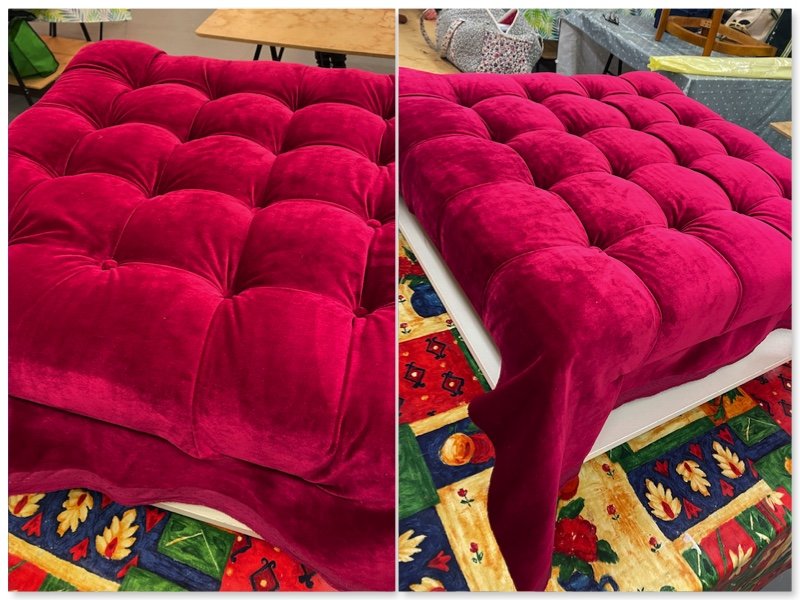
I’d long been toying with the idea of changing the Ikea (do you sense a theme here?) coffee table I’d been using for nearly a decade, into a padded footstool. Now seemed the perfect time to put my notion into action. I mean, I’d re-upholstered a whole chair, how hard could it be to add some padding and buttons to the top of a coffee table?
I’m pretty sure you won’t be surprised to learn that the answer to that is: harder than it looks!
Again I’ll spare you the details, but the devil is in the detail when it comes to the planning, measuring and execution of the button spacing and depth. And then there’s the making of the buttons themselves and threading them through the fabric and padding, securing each one exactly the right distance apart and at exactly matching levels.
Here’s how that all went:

How the table looked before

Making the buttons (these were the practice ones which I used to work out the spacing and tension with) was surprisingly physical
During the during stages - note that the table has changed colour

Aaaannnddd…the completed item
I realise my two little projects hardly make me a master upholsterer, and there won’t be any more for the moment - I’ve quit the classes due to a combination of not having any more projects that need doing, nowhere to store any that I might work on, and needing to cut back on my expenses. But the skills and insights I’ve learnt, and the friendships I’ve forged with my fellow students have been rewardingly creative and wonderfully life-enhancing, just as I hoped they would be.
Wonder what I should have a go at next……any suggestions?
Find details and information about all the courses at the St Albans Upholstery School HERE
Other posts you’ll enjoy
A beginners guide to block printing

